
ACES Finally Fixes A Big Problem | DaVinci Resolve Tutorial
What’s going on Qaznation! In this video we are going to be looking at one of the biggest issues we had with the previous version of ACES, and how to fix it with the current version. It still takes jiggery pokery, but we will break it down.
Now for those who don’t know what ACES is, it stands for
Academy
Color
Encoding
System
Basically, the academy came up with a standardized system where the entire pipeline, when it comes to pre-production, production and post-production, all stays consistent.
If you watch content on multiple devices, then the color will look different among all those devices. So imagine the same thing happening at that scale when you are trying to do it on that scale. Imagine something so CGI crazy like Game of Thrones. So it all has to come together perfectly for it to be believable and realistic. So if different stages are seeing different colors, then it doesn’t look good. That’s where ACES comes into play. Big production houses are completely on ACES, like Disney.
Okay so we are going to be working on three different shots. Two from Arri Alexa, one from DJI Phantom 4. Usually what you do if you want to work in ACES, you change it project wide. We are going to change our color science to ACEScct. Then I’m going to leave the input transform on default and make the output transform to rec.709. Then I’m going to make sure I check on the use color space aware grading tools.

Once you do that, you get a change from this

To this

This is happening because we haven’t fed it the right information. I’m going to select the last two clips, and right click and under my ACES input transform, I’m going to select Arri and Arri LOGC3.

Once I do that it is a proper conversion.

But you can see this dreaded ACES problem.

The problem with this is that because we have this color management applied to the whole project, we can’t really go behind the color management and fix it. So what can we do here? What I can do is go under my hue vs saturation and pull my blues down.

But am I fixing it? No. Just look.

This is Arri Alexa and it shouldn’t happen. This wouldn’t happen in a normal color space. If we change it back to DaVinci YRGB and rec.709 gamma 2.4, then convert it properly, you can see we don’t have the problem.

The other problem is that you almost have to be an elitist to be “accepted” by ACES. That’s why this DJI shot looks so bad. Because they aren’t accepting DJI.

Like if I try to do an ACES input transform, where is DJI?

The way you get around this, is to start experimenting with different profiles. Change the input transform to different cameras and see which one looks okay.
So what we’ve determined here is that the project based color management is a no-go when it comes to ACES color space.
What we are going to do is come out of the ACEScct, and go to working on a node tree based color management. So I’m going to change my color settings to this (picture below)

So now, we are going to recreate the scenario before the problem was fixed. To do it that way, you’d first apply an ACES transform. You’ll notice that there is a 1.3 version, which we didn’t have before. We only had 1.2.

Why is 1.3 special? Because of the extra option that opens up.

But hold your horses, we aren’t there yet. So what we do in an ACES input transform, we’d select the information we wanted, and it would transform it.

But hold your horses, we aren’t there yet. So what we do in an ACES input transform, we’d select the information we wanted, and it would transform it.

But again, you can see that same issue. However, since we are in a node based level, we can hit shift + s to create a node prior to the transform, and fix the issue. So we can go into our HSL curves and do the changes to fix it.


You can see it’s already a lot better. We weren’t getting this result before on a project based level. But it’s not fully fixed and we are changing the inherent quality and the look DNA of the image.
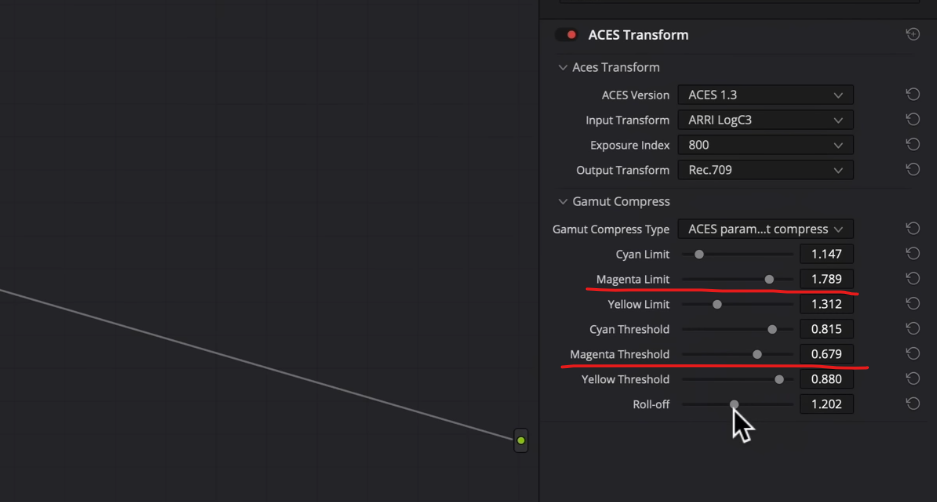
So now how do we fix it? We are going to do the same thing and apply an ACES transform to the clip, but we are going to select ACES 1.3. I’ll select the same transform information, but then I want to change the Gamut compression. Now there are two options you can choose from.

We can choose ACES reference gamut compress, which is a sort of semi-auto feature that does a lot, but then you have the ACES parametric gamut compression, which is more manual.

So now we can take the magenta limit and increase it. Then we can pull in our magenta threshold in and it works better.

So this is what you’d do in the new iteration of ACES. It’s so powerful.

Ultimately you want to play with the parameters and see what happens when you change certain things, which will help you figure out how to fix the images. It won’t crack your image at all, it just helps you get more control over the image.
Hopefully this was all helpful. You can see that with color grading there are so many ways to get to your destination, but there are efficient ways with more accurate results, the “right way.” And on that note, work hard, get obsessed, and get possessed.
MORE LIKE THIS


