
Instagram Reel Export Settings for DaVinci Resolve | Upload High-Quality Videos
What’s going on everyone! Welcome back to yet another epic video and today we are talking about how to get high quality uploads for Instagram. A lot of people see something different inside Resolve compared to what they get on Instagram. So today we are going to answer that.
The game plan is simple. I am going to export 5 different versions. Then we are going to look at them inside the Mac vs. how they look in Resolve. Then we are going to upload them to Instagram to see how they look compared to Resolve.

Alright, now we are going to jump into Resolve and we are going to go through what I’ve done. I’ve created five different versions to figure out the best way to get the most accurate colors and compression when you upload to Instagram.
The first version had these settings. Basically you click on H.264 master, and leave everything alone.


Then version two, we only changed the color space tag and gamma tag in the advanced settings to rec.709 and gamma 2.4.
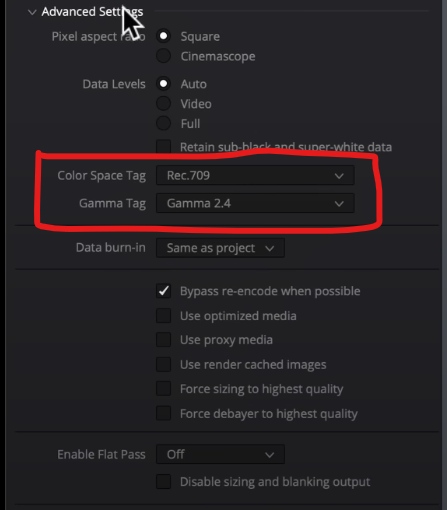
Normally these are set to timeline and if your stuff isn’t properly done, then it won’t convert properly in the export. This overwrites your project settings.
Now for our third version, all we changed from the second version is the gamma tag. For this, we changed it from gamma 2.4 to sRGB.

I did this because that is the gamma tag for the web.
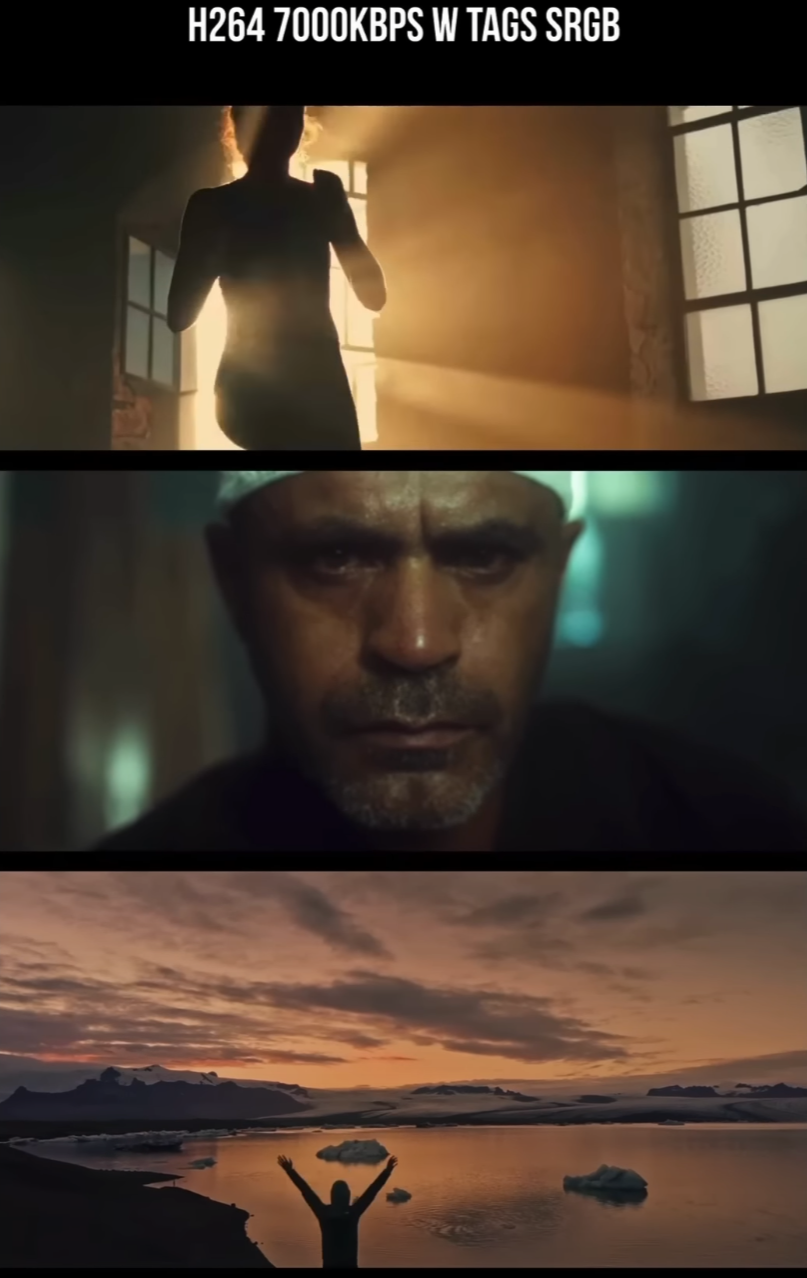
Now for the fourth version, all I did was restrict the quality to 7000, but left everything else from the third version the same.

I did this because if you give Instagram too big of a file, it will compress it in the app. It’s worse than bottlenecking it on our end, so Instagram can just bypass it and upload it. Now there is no white paper formula for this, so don’t take my word for it. YouTube has this, so just don’t take my word for it and experiment when it comes to Instagram.
The fifth version, I did H.265 master and I left it as is.

Now we are going to look at these versions compared to what’s in Resolve. Starting with the first version, which is auto with no tags.


The one in Resolve has less punch to it so the export is doing a gamma shift if you don’t do any tagging.
But what happens with version two when we did the gamma 2.4 tagging?

This is the same as with no tagging. So there is no difference.
Moving to version three, this is where we start to notice the difference. This is when it changes.

This is the exact same as what we see in Resolve. So tagging the export with sRGB is great if you’re showing someone on your Mac or the phone.
Now the fourth version is that we only exported it with 7000 KB/s, so the color tag was the same.

The difference is definitely a bit noticeable in the background. There is a bit of banding, but after YouTube’s compression, you might not even be able to see it 100%.
So now we are moving onto the H.265 in auto.

Again, it’s doing the gamma shift that happened with versions 1-2.
Now everything changes when you go to upload to Instagram.
NO TAGS

AUTO WITH GAMMA 2.4

You can see here, again, no difference between them. So once it goes up, it gets converted to sRGB anyway. Same with sRGB, it looks the same as the others.

So what is it that we have to look for when uploading? We need to look for banding, look at the quality and compression. It’ll be hard to see on these screenshots, for full effect, watch the video.
MORE LIKE THIS


